The Article
NCF Boosters & NCF Booster Signals From Furutech
14th August 2018
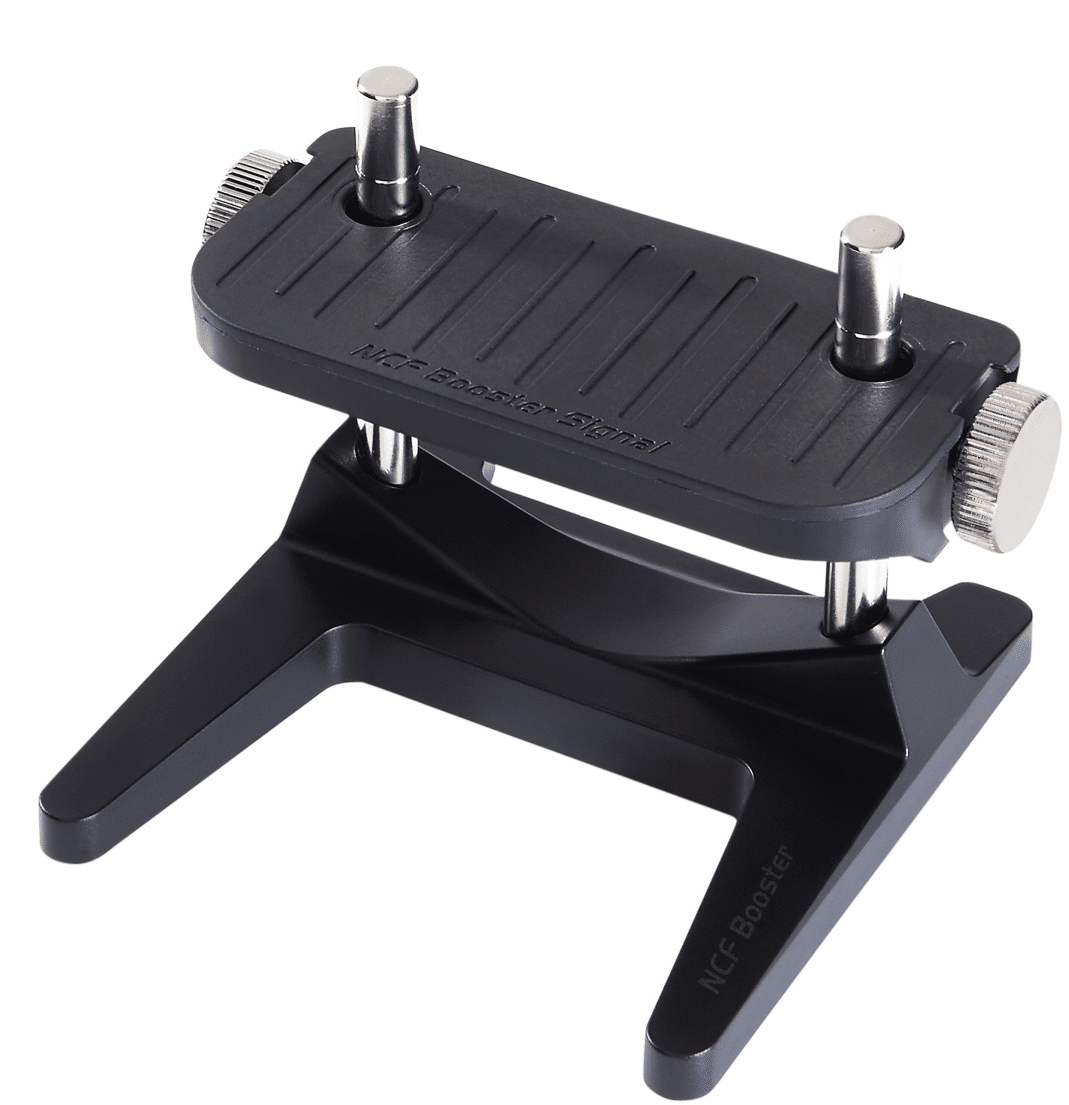
They look like simple cable iifters, they act like simple cable lifters but Furutech’s NCF Boosters and NCF Signal Boosters are different beasts indeed. Paul Rigby reviews the lot
I have to admit that I was pretty confused by cable lifters for a while. What do they do? Many lifters appear to want to do nothing more than elevate the cable off the floor. From what I can fathom, the idea of the cable lifter is to isolate a cable from static electricity, often generated from floors and carpets, especially carpets created from man-made fibres. Such lifters, often constructed from expensive woods and priced at high hundreds and even thousands of pounds, have frequently triggered derision and ridicule from hi-fi users. Partly because of the asking price of the same but possibly also because of a misunderstanding of the goals of these accessories. In response to queries, these same users have often cheerfully offered cheap and cheerful alternatives: everything from egg boxes to upturned paper cups.
I have an open mind in terms of all hi-fi products but even I, on that basis, had found it hard to argue with such suggestions.
There are a few hi-fi companies out there, though, who are looking to do more with these odd little accessories. The core of the task of these particular devices is a little different from the norm. Lifting the cable away from static is merely a part of their job. Basically, these more advanced designs look to drain veiling noise from the cable or they turn that energy into heat or similar. In practical terms, these rather specialist lifters are not a million miles away from the successful Grounding products that we now see on the market.
This variant sounds more interesting because it offers a more proactive method of enhancing sound quality.
But hang on, do cables really warrant this sort of attention in the first place? The more I research the subject of hi-fi cables, the more I see that they do, yes.
Most people look at a hi-fi cable, any old type, and imagine a piece of wire covered by the material they are looking at: a plastic, fabric or weaved material or some similar mixture. Most people think that this protective outer layer is a hard barrier, that it keeps the music signal and everything else in there protected and safe. Like a version of the Tube where the people are underground and the trains are encased in tunnels. Anything that happens, happens inside the cable which is a clean and efficient environment. End of story.
Well, it’s not quite like that. Firstly, your music signal is in there sure but there’s other stuff in there too. A lot of veiling noise that is picked up for the ride. It comes from other parts of your hi-fi or the mains but, and this is the mind-bender, it also comes from outside too. From radio signals, Wi-Fi or your mobile phone, static, from vibrations sourced from the house and more. This stuff can often get through the outer layers of your cables to further crowd the music signal. Getting in the way, basically.
This noise interferes with your music and kills fine and subtle detail. The better your hifi system, the more you will experience its effects.
OK then, what about shielding? Doesn’t that stop noise from the outside world getting in?
Moot point and one that is a source of argument, even amongst cable manufacturers. Some outfits plaster their cables with shielding, others believe that shielding makes sound quality worse because it traps noise inside the cable, which bounces around inside like a game of Computer Pong. I’ve even heard some cable builders say that shielding is ineffectual at keeping all noise out in the first place and it should be removed altogether. Gekko Cables, for example, uses no shielding on most of its hi-fi cables because it says that shielding does terrible things to capacitance.
So, while you might put your turntable on a wall shelf or expensive shelving rack, then put a better platter mat on it along with a stabiliser, you might put isolation feet under your amp, you might connect a power conditioner to the mains or a CAD GC1 to your phono amp and DAC, most people tend to ignore the noise that is positively swilling in and around the cables themselves.
Removing noise from your hi-fi is an essential task but there’s no sure-fire single way to get rid of the stuff. You need a toolkit of accessories to do the job.
Furutech states that its NCF Boosters and NCF Booster Signals should be considered as one element of that broad anti-noise toolkit. So what are they and what do they do?
Let’s first look at the materials used to build the Furutech devices. Both of the Booster and Booster Signal units utilise a proprietary material that Furutech calls Nano Crystal² Formula (NCF). The material removes static but also converts thermal energy into far infrared. A noise drain point, if you will.
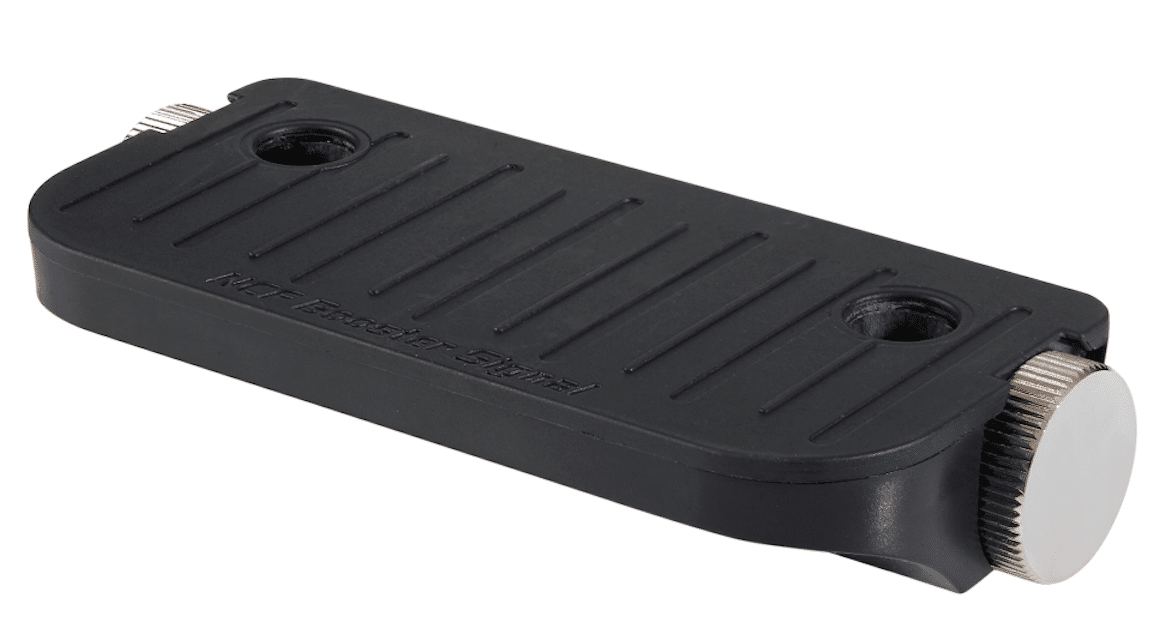
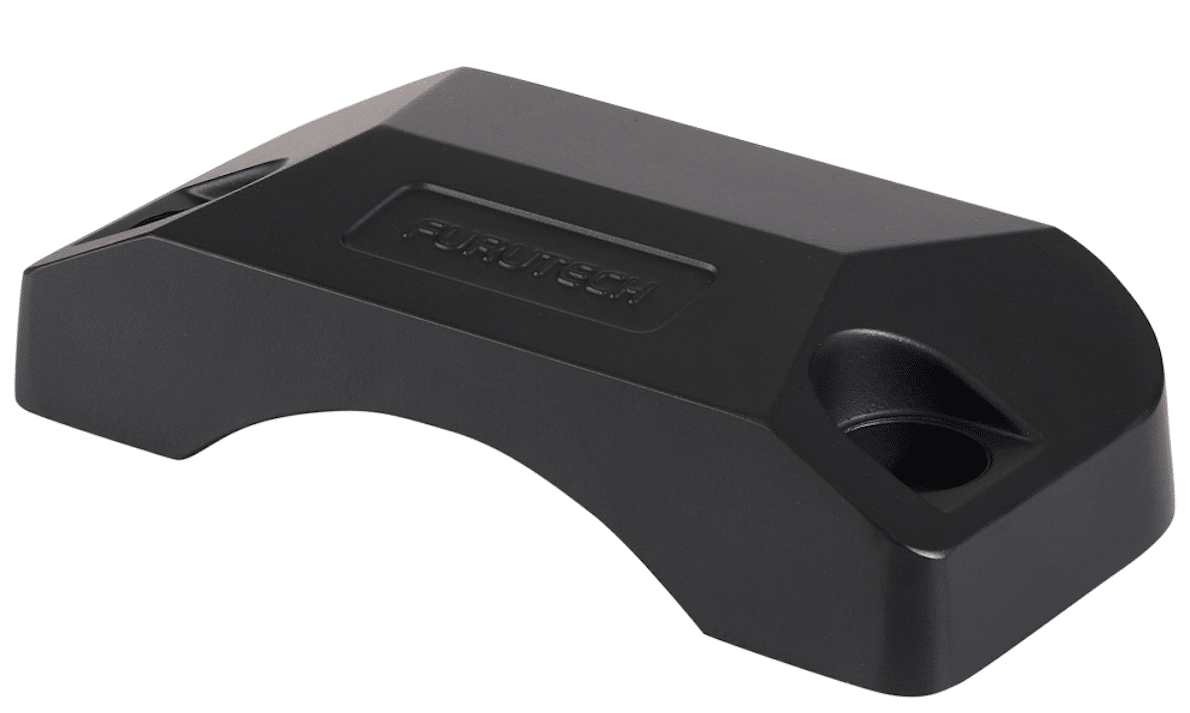
The Boosters and Booster-Signals are built to different specifications. They look different, to begin with. The Booster has a U-shaped cradle that the cable’s termination plug sits in. On the other hand, the Booster Signal’s cradle is flat.
The Booster comes with a top clamp (designed for power cables) which can be removed. The Booster Signal comes without a top clamp but with the option to add one, according to what works best in situ. Additional extension clamps and lower cradles are available as optional extras, allowing for multi-level support structures.
Both units arrive in kit form. The vertical pins are screwed into the base and the horizontal platform slips over those. The two side screw wheels feature opposing threads which is useful for fine tuning. This means that the platform can ride along the pins and sit at any point.
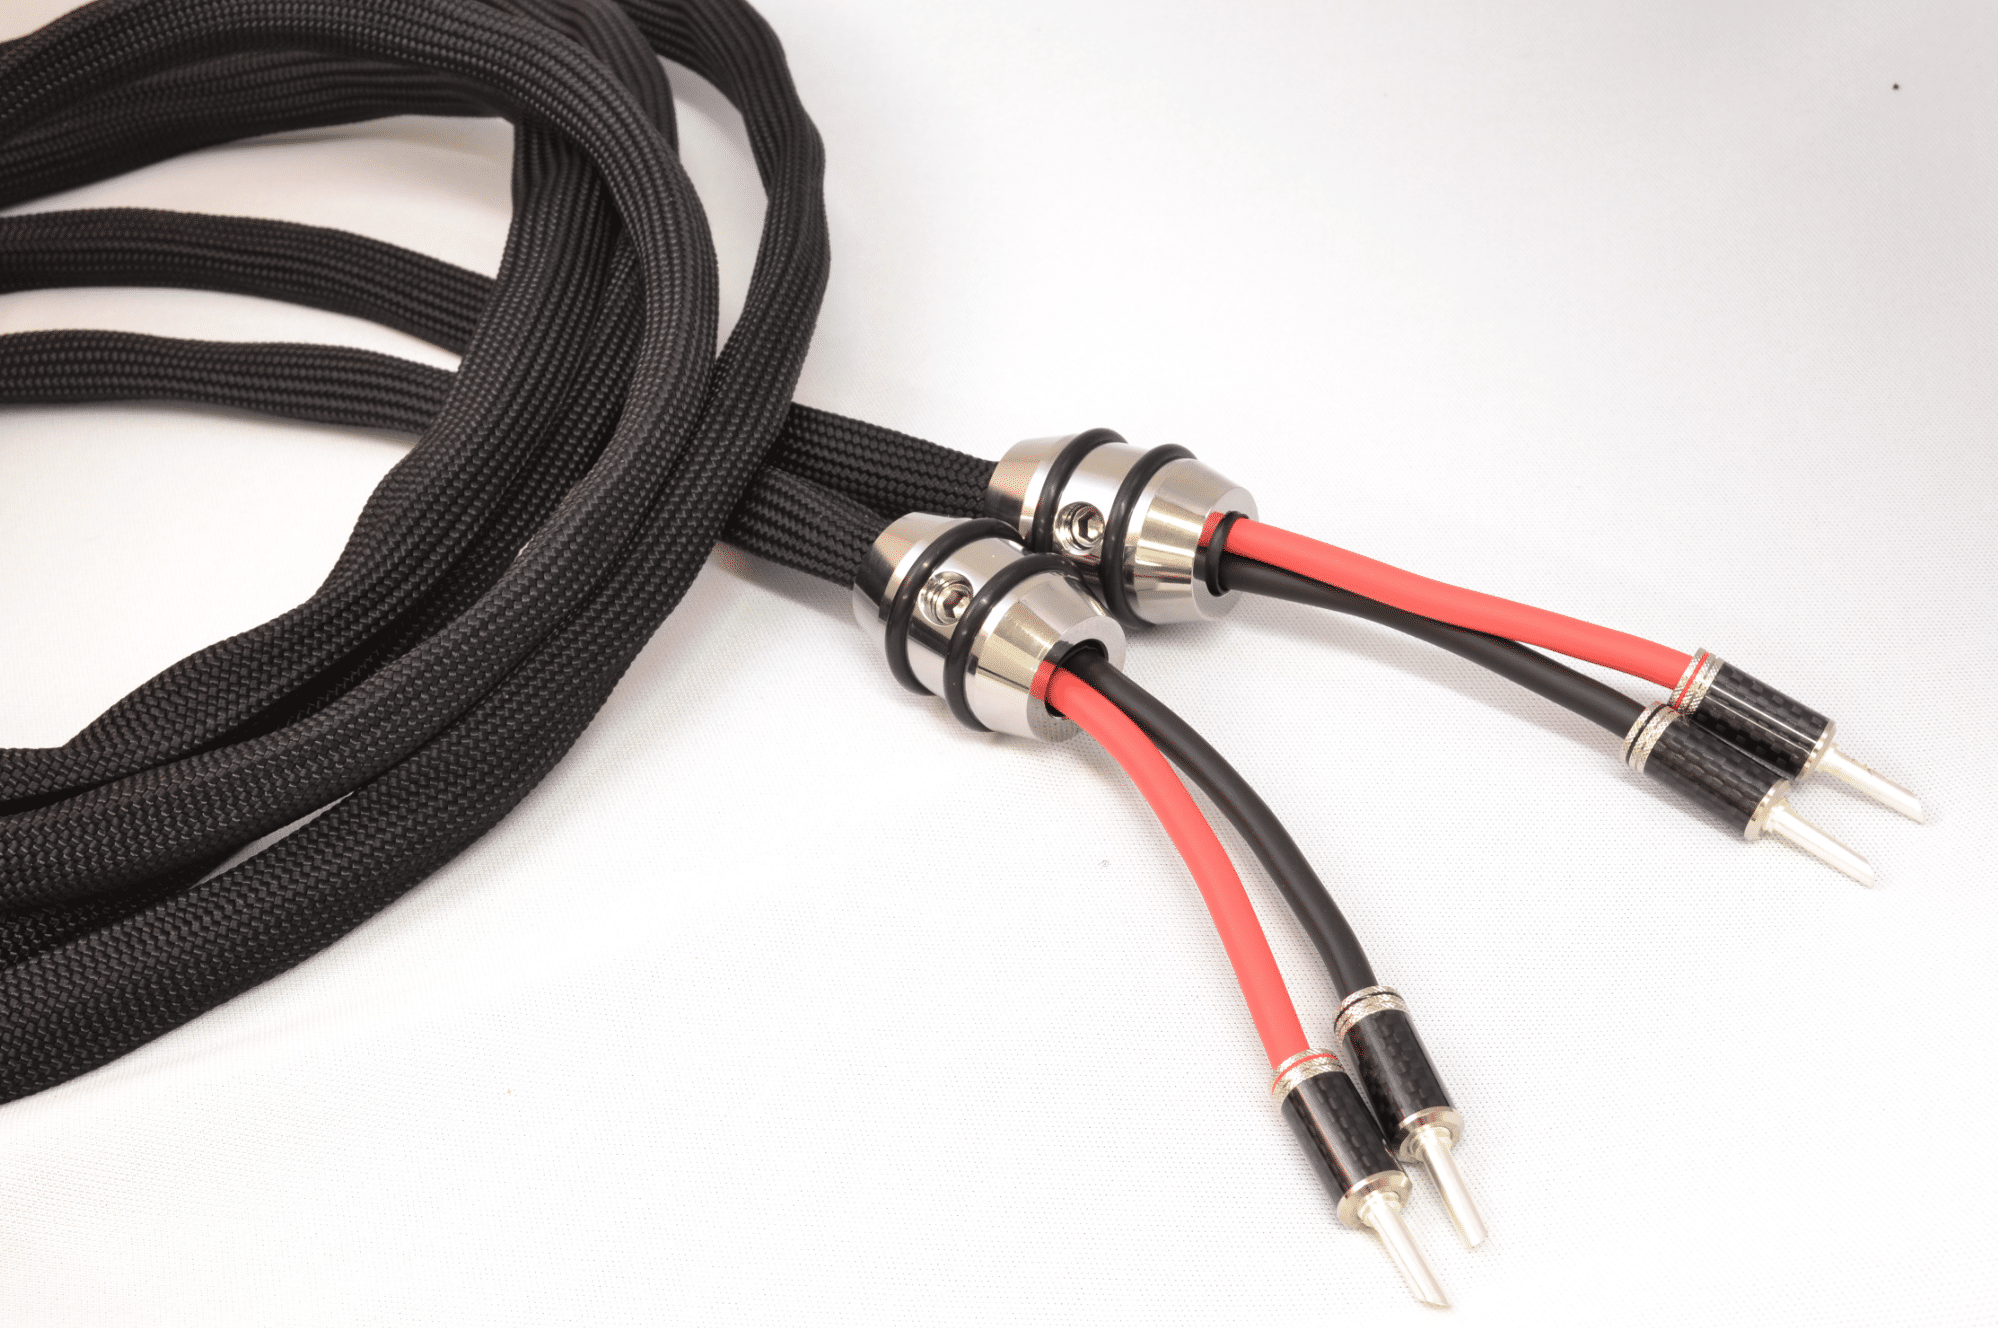
The Booster’s U-Shaped platform cups or cradles a typical power cable. There’s enough space for even bulky mains termination plugs to sit easily in the cradle. The Booster Signal, on the other hand, is designed for speaker cables and other interconnects and so doesn’t really need that same leverage support. My own speaker cables are flat which is even better for the right fit.
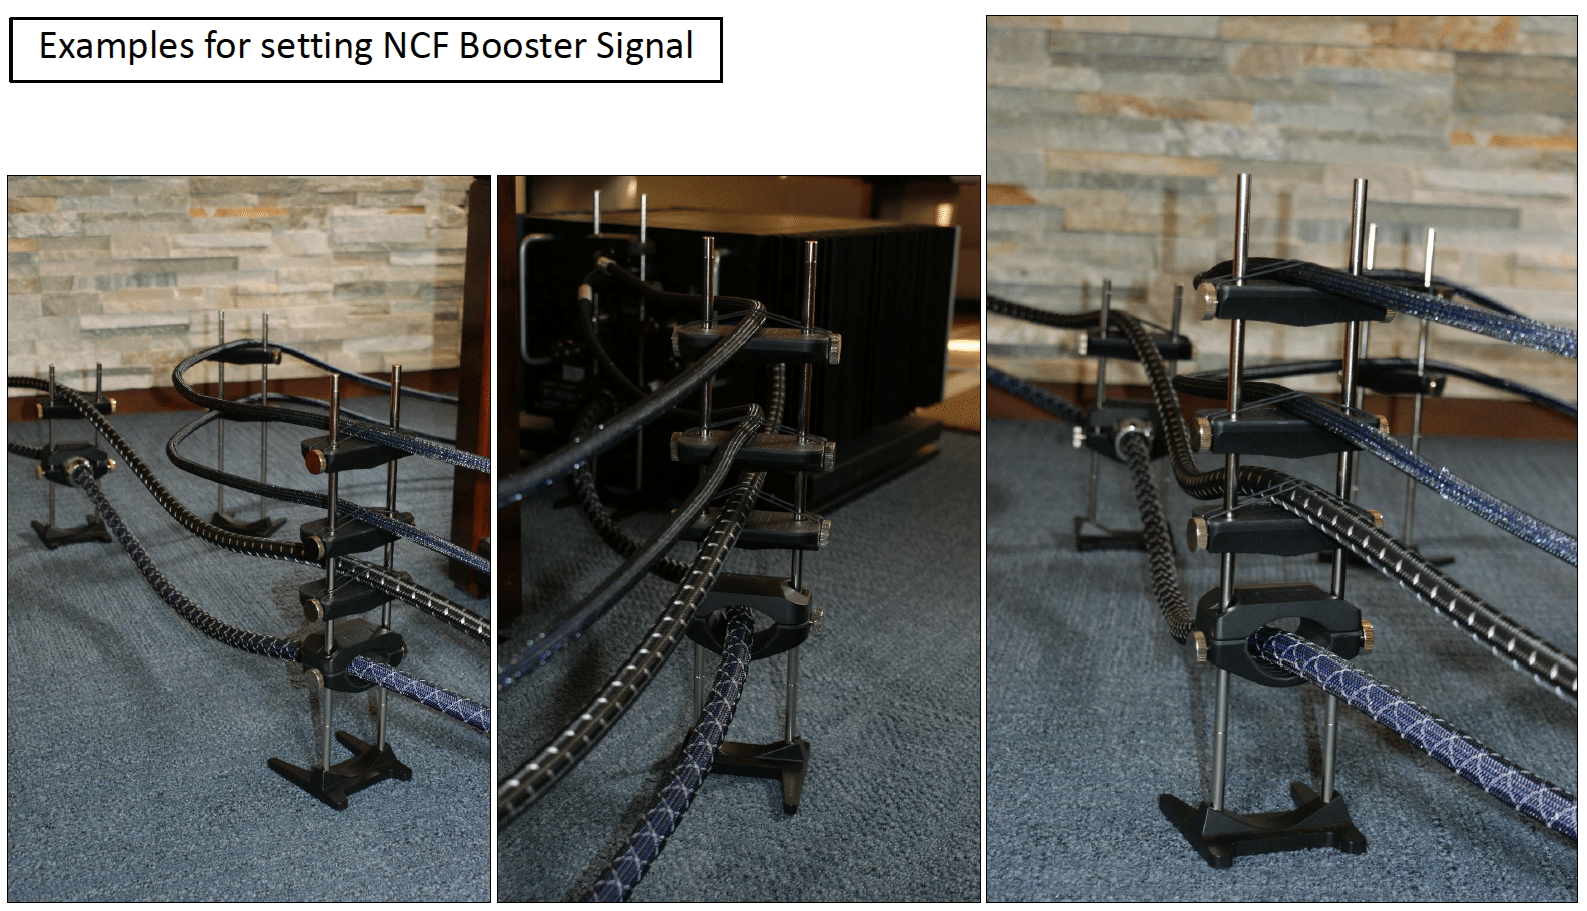
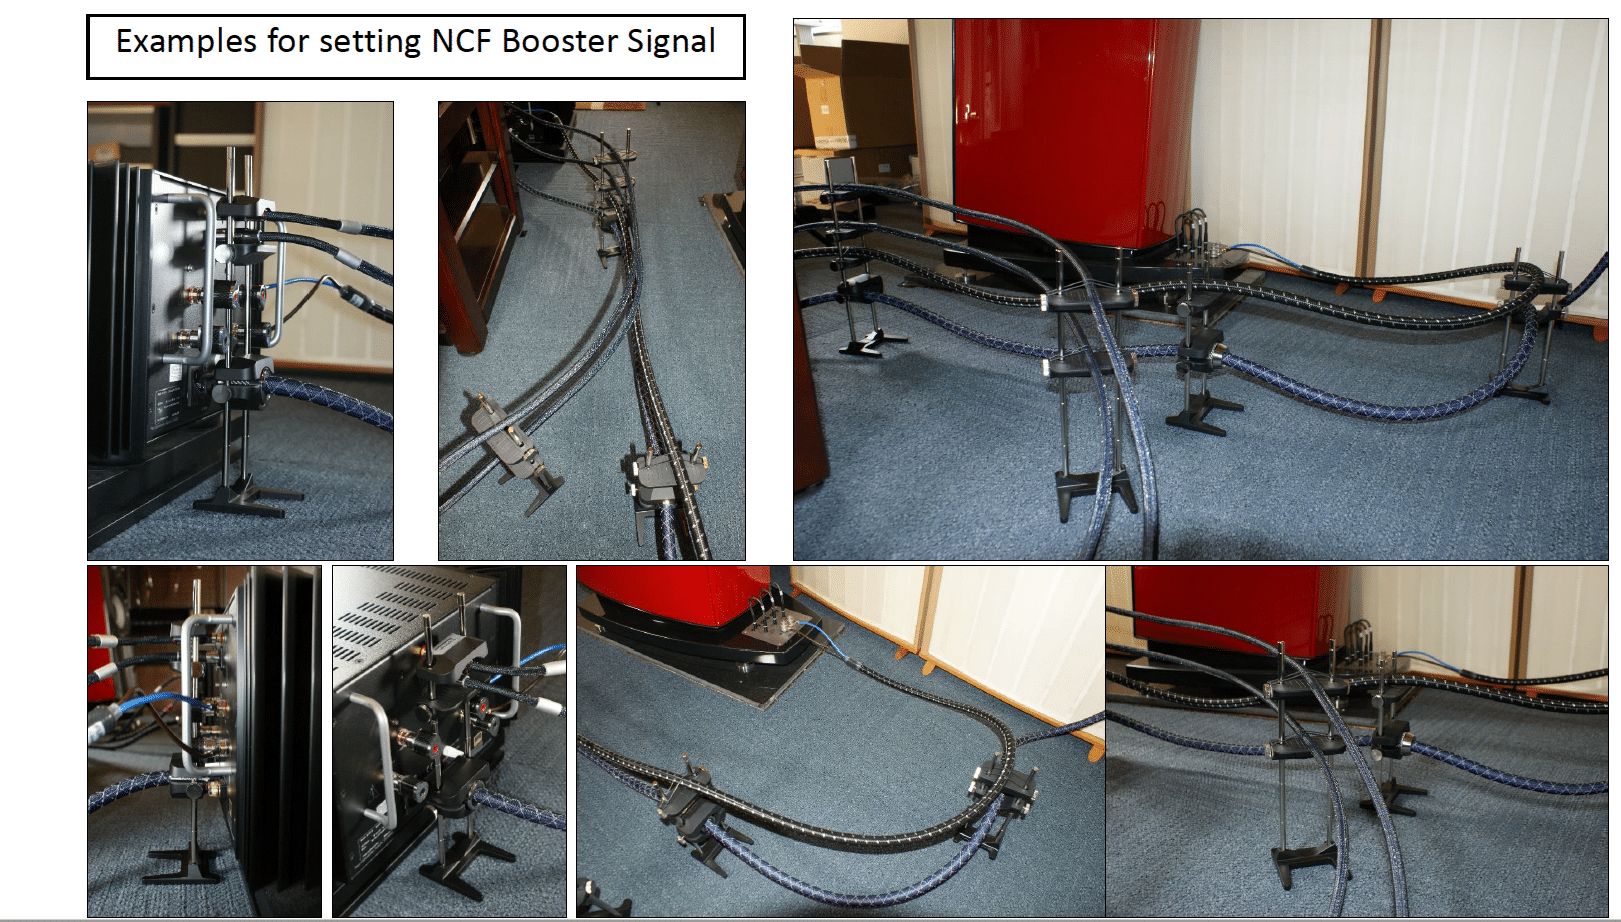
Sturdy rubber bands are supplied to secure the cables to the platforms. You can also use the bands to secure round cables to the outside of the platforms which maximises space and allows a larger cable to run through the centre portion (see image at the bottom of this review).
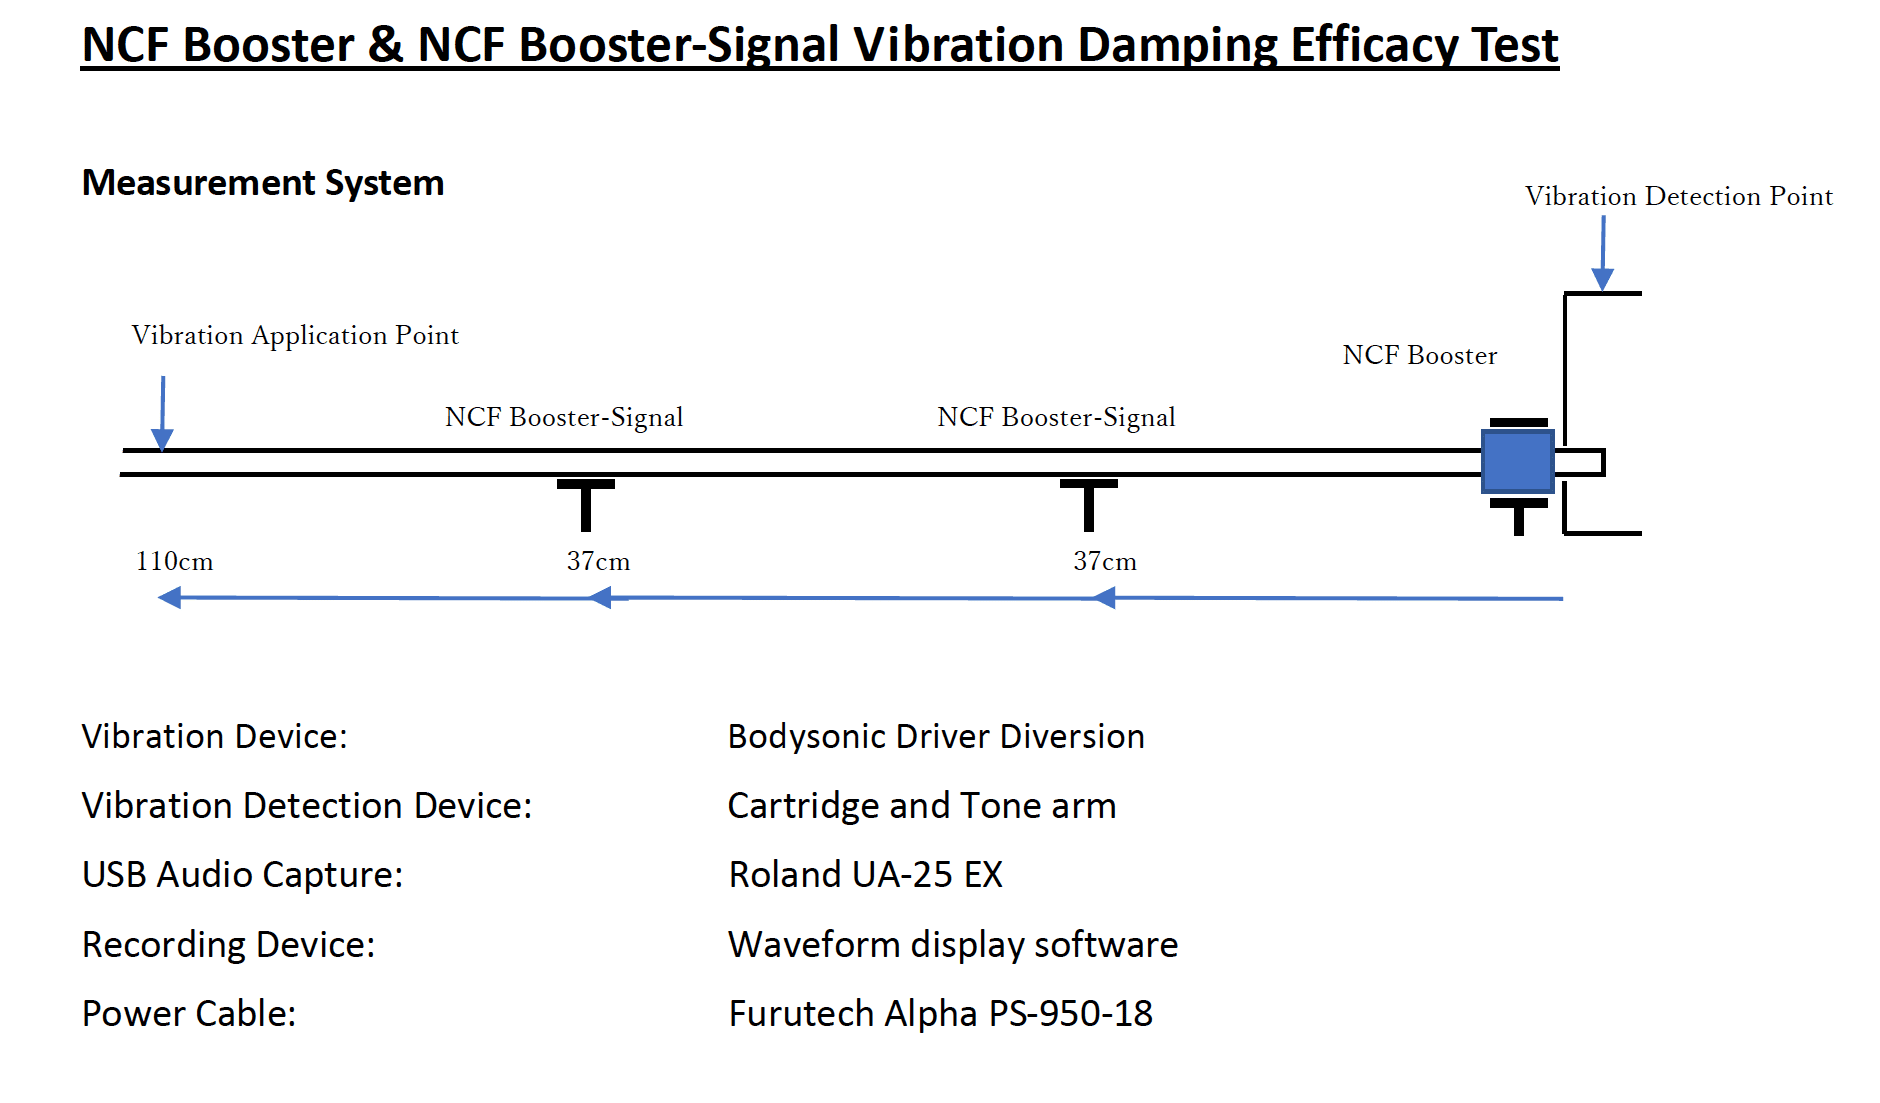
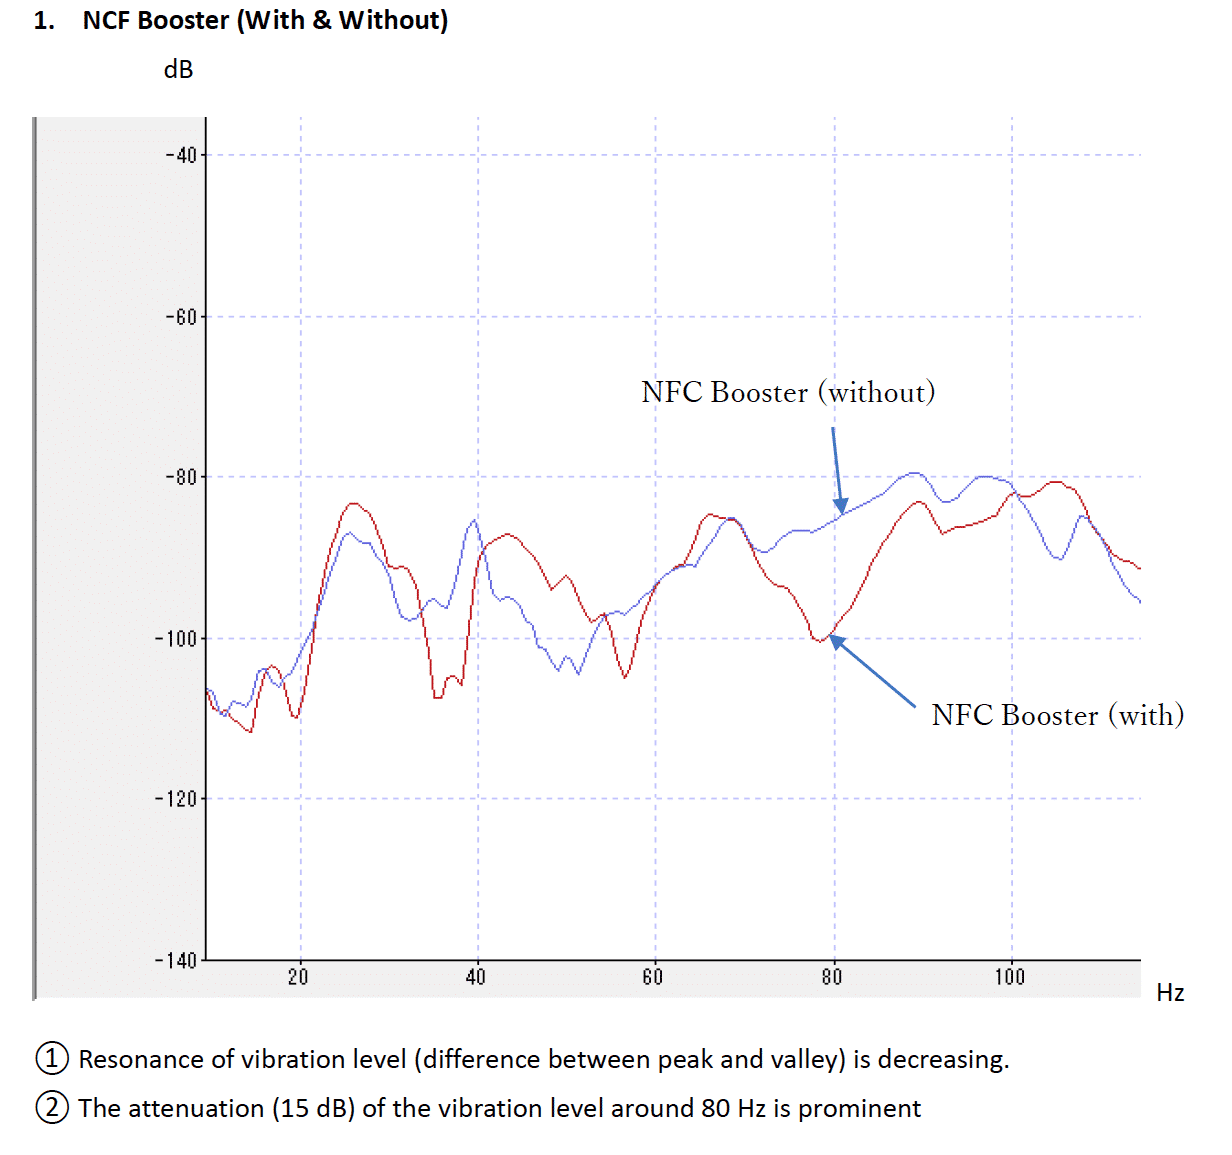
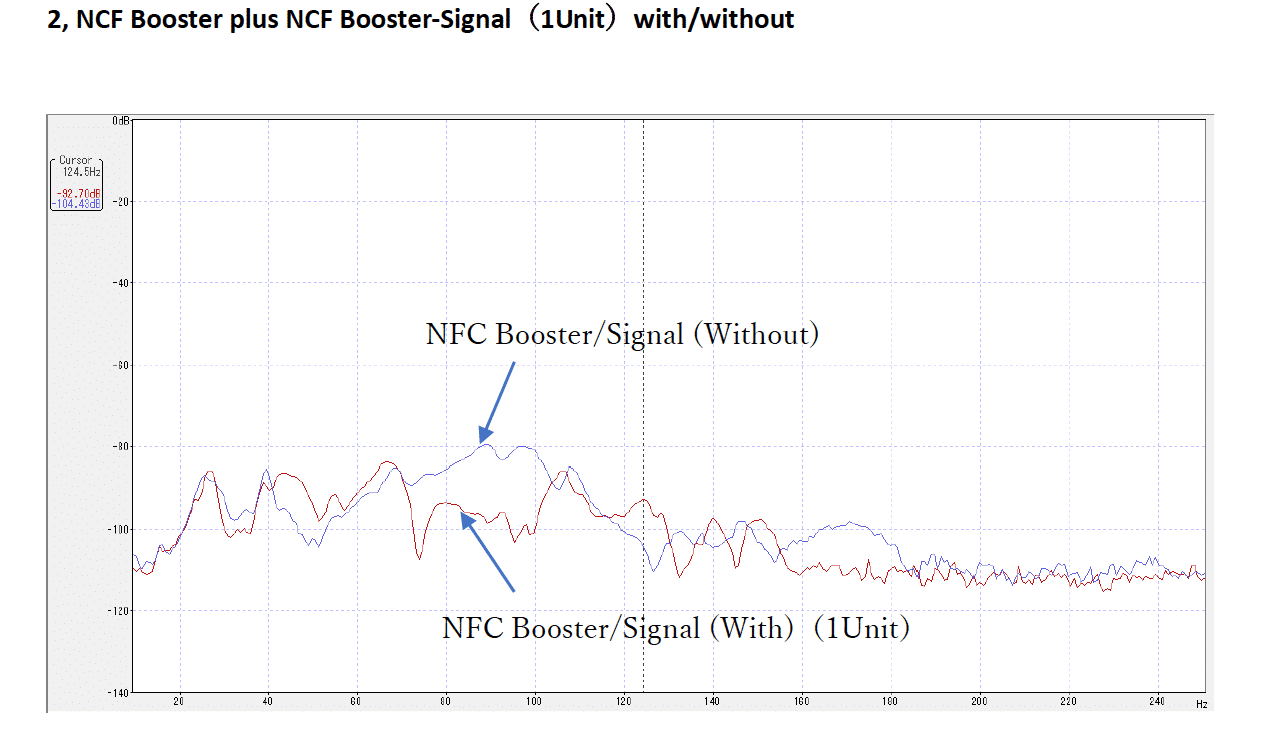
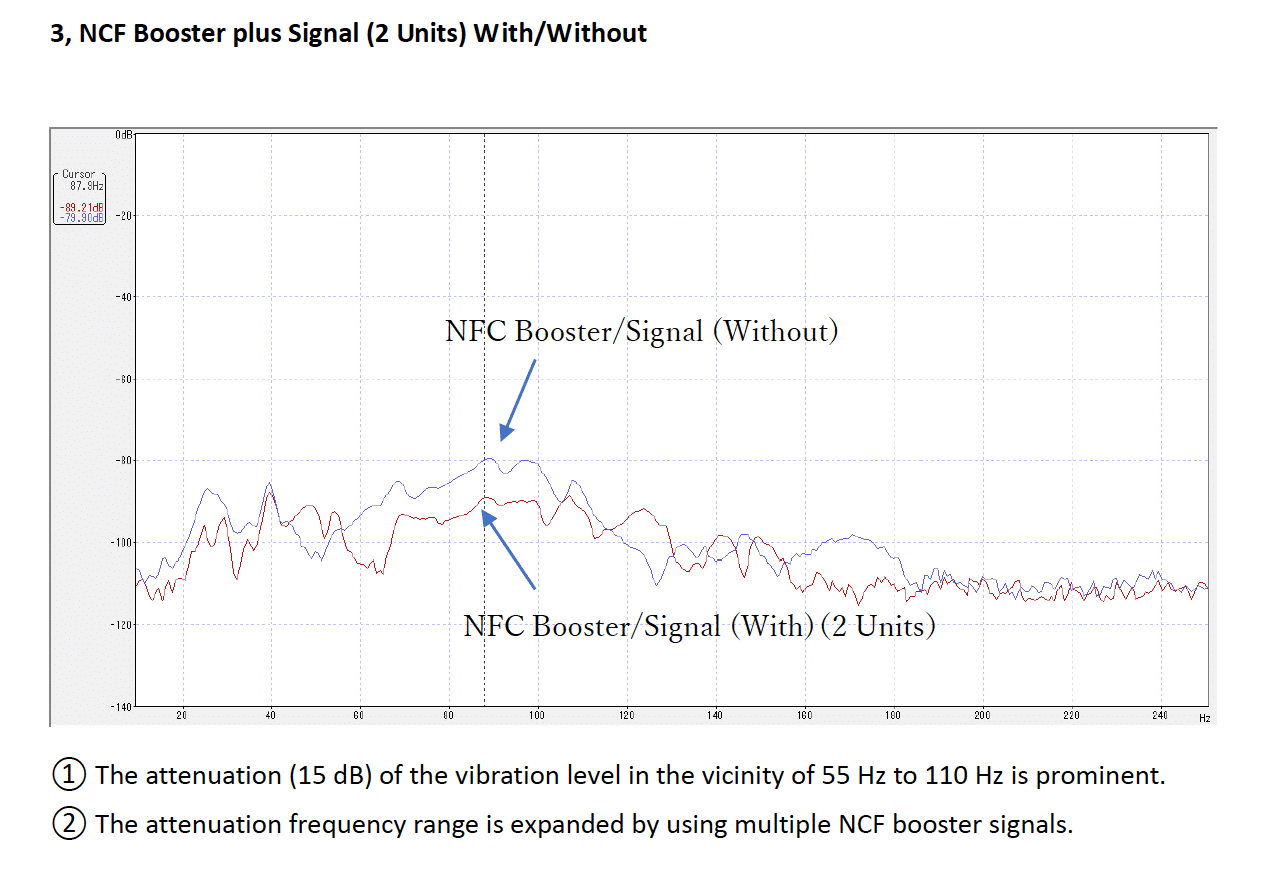
I had a few questions of my own and so was fortunate to talk to Furutech’s engineers in Japan about the Boosters/Booster Signals. The guys were also able to kindly supply me with several test results which I’ve included above and below here for your perusal.
Before I dived into the sound tests, I wondered if it mattered where you placed the units under the cables in terms of sonic improvements, “Yes, it does matter,” said the engineers, “and the user should experiment with different placement positions to find the best result. Electrical and mechanical resonance can be focused at certain points (i.e. connectors, points where cables contact flooring or racks, points where cables are under stress – tight bends, sagging cables). Placement of NCF Boosters at such points is important for best results.”
I also asked if more than one unit placed under the cable would make a difference, “Yes, the more damped the cable becomes, the more changes will be heard in playback,” they said.
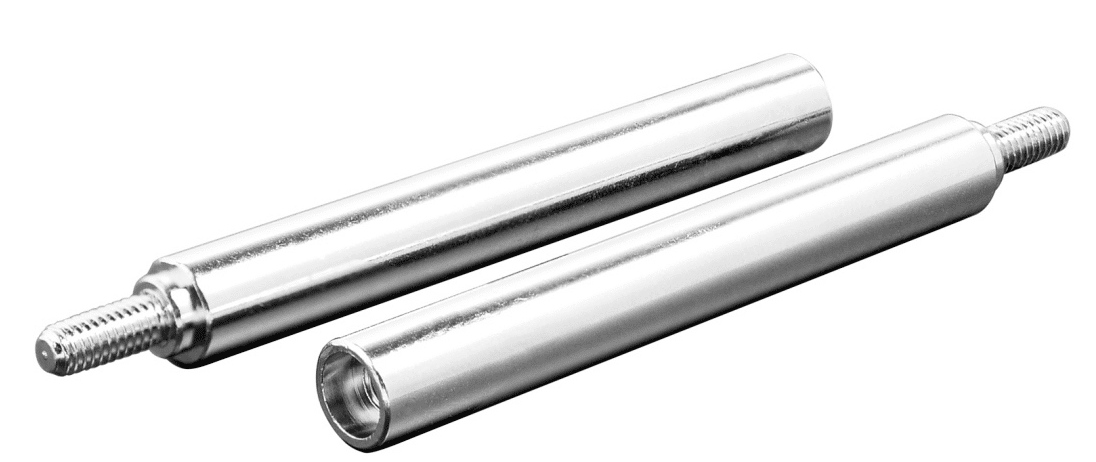
Also, as long as cables are isolated and secured on Boosters/Booster Signals, nearby cables should not have any influence. Using the product extension bars and additional Booster cradles, it is also possible to vertically stack cables (speaker, line and power) in isolation. See below images.
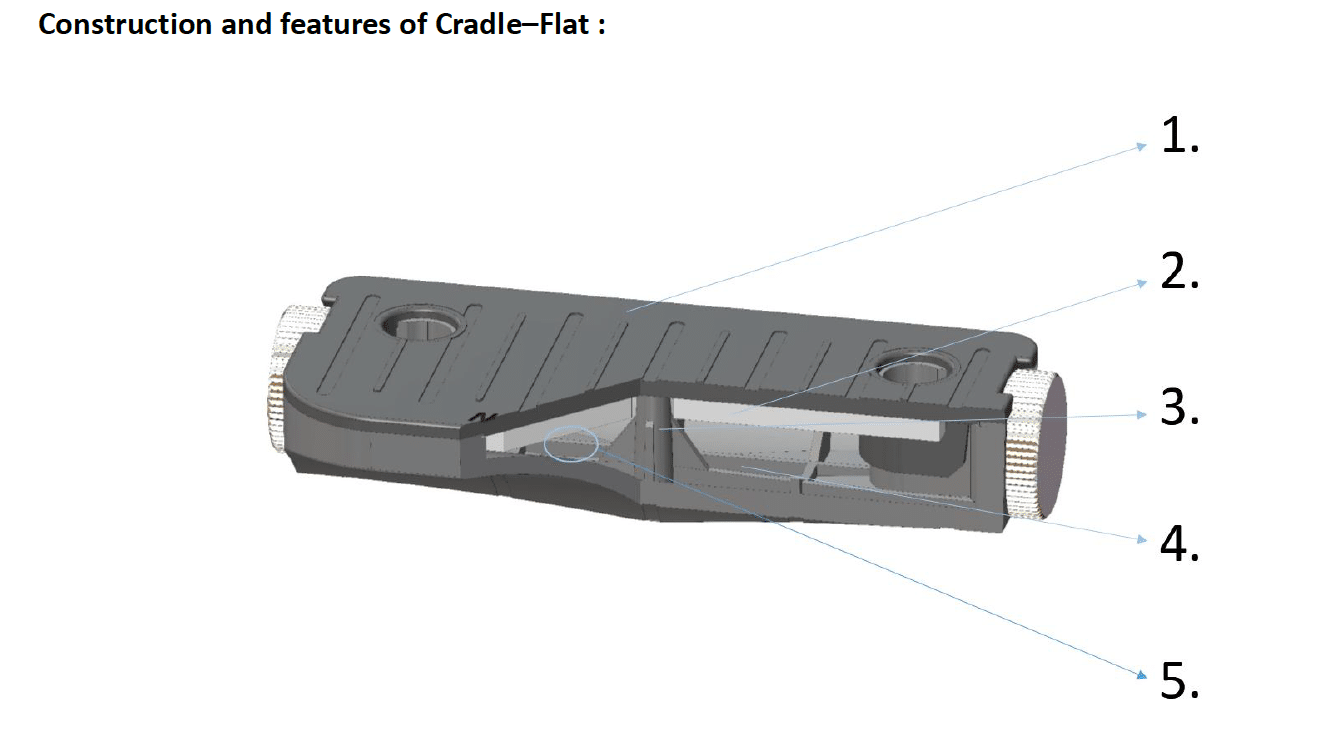
As you will see in the sound tests below, I did find that the Booster sounded different to the Booster Signal. Apparently, this is down to the amount of NCF material used in each product. Also, “…an additional special damping material and construction of the Cradle-Flat are the reasons for the Booster-Signal’s slightly different effect on sound. The Booster-Signal was designed and optimised for use with signal cables and several designs of the Cradle-Flat with varying amounts of NCF were experimented with before settling on the current design,” said the Furutech engineers.
One point that the guys did raise was that flooring makes a difference to sound too. I used wool-based rugs as my base but, “…any radiated resonance in flooring and floating static fields on synthetic materials will affect playback performance.”
I was intrigued to hear from Furutech that the entire cable does not need to be lifted off the floor by the Boosters/Booster Signals to make a difference in sonic terms. This was a relief to my ears because I was not supplied with enough units to lift all of my cables entirely off the floor, “That would be the NCF material at work,” said the engineers, “damping and eliminating static charge. Even when used at only one point on a cable there will be an audible reduction in noise.”
SOUND QUALITY
It needs emphasising that Boosters and Signal Boosters need experimenting with in terms of position and configuration for your own system. Every hi-fi system and the room it sits in is different. Every user will require time spent to experiment to maximise the performance from the Furutech units. Any stockist of Furutech Boosters/Booster Signals should be able to provide a home loan agreement to enable you to test the units on your own system.
This is going to be an extended sound test because I wanted to do it systematically. Trying one pair of Boosters and Booster Signals at a time and contrasting. I wanted to make doubly sure that each component was having an effect: whether that be good, bad or indifferent.
What follows reflects my system and my experience. I hope it provides some sort of general guide for your own endeavours.
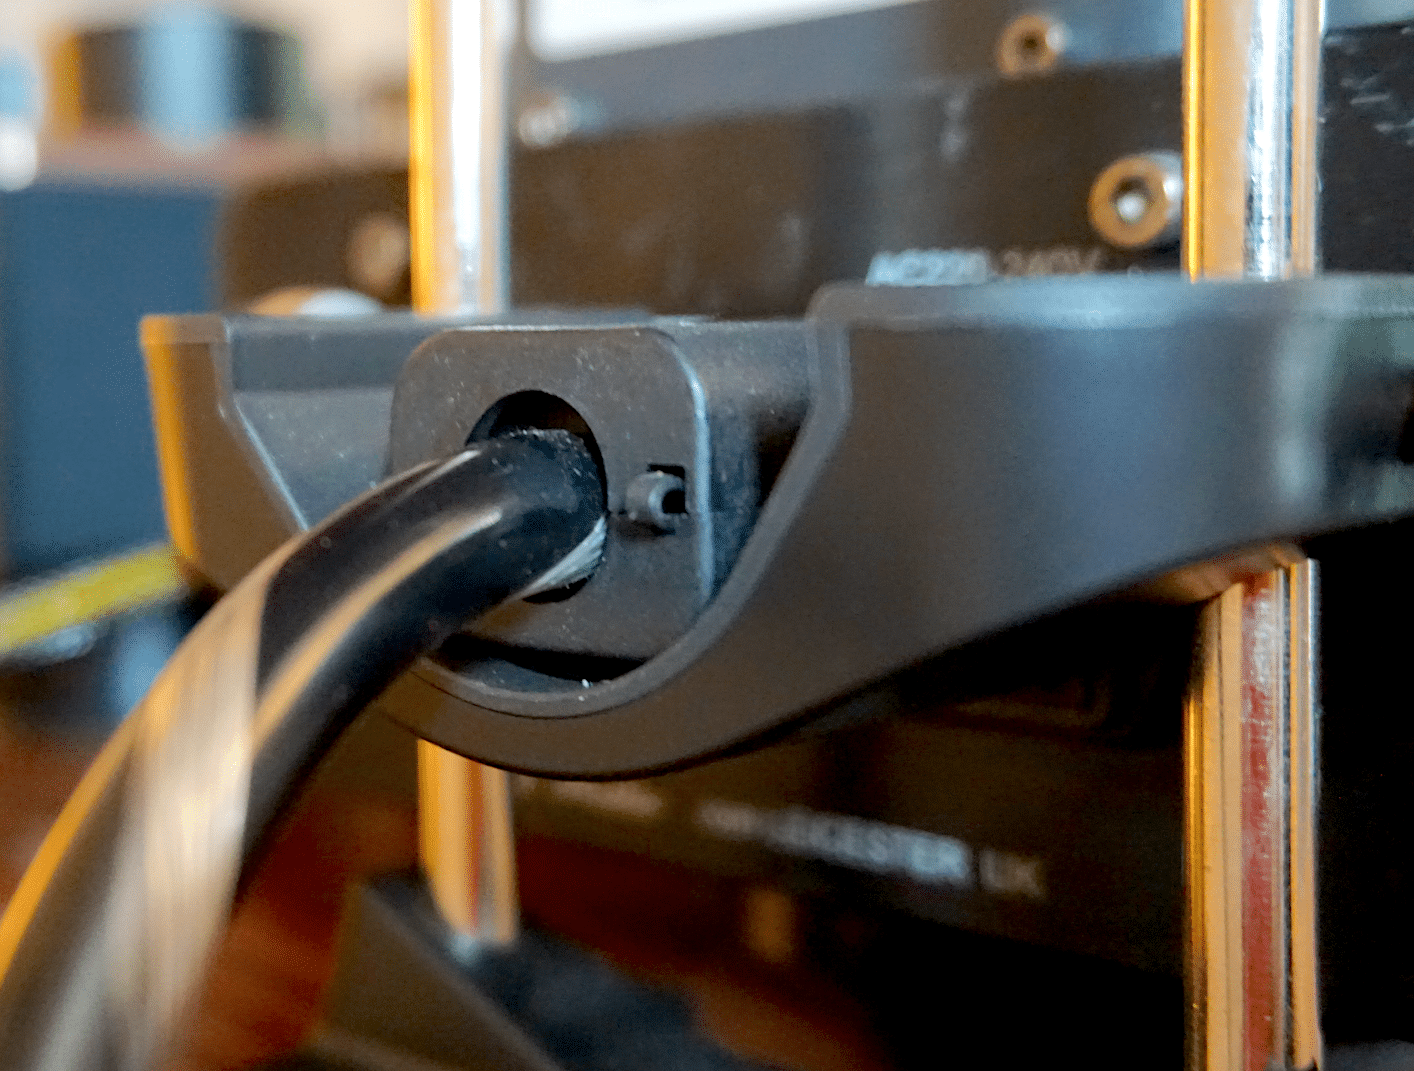
I began the review working with two Boosters. I initially placed both underneath the mains cable plugs of my large, floor-based monoblock amplifiers. Actually, the amps were slightly elevated on individual stands but they still remained pretty close to the floor. I then played the vinyl version of David Bowie’s Breaking Glass from the album, Low. When fitted, the mains cables rested on the U-bend shelf of each Booster. In fact, each Booster had slightly lifted up each mains plug to a perfectly horizontal position, reducing cable stress. Previously, the weight of the mains cable had pulled it down, just a touch. At this stage, I left the top clamps off each Booster.
Tests showed a definite noise reduction here. The difference was mainly heard around the bass but the vocals also offered extra definition, especially as the Bowie voice was triple tracked. There was great space between each vocal overlay.
In terms of bass, the lower frequencies were punchier. The greater impact also added pace to the track. That said, bass offered a touch too much, spoiling the previously neutral aspect of the soundstage. The effect wasn’t bad, just a little bit unsettling.
I then added the top clamp to the Boosters to see if they had an effect. I had two comments regarding the fitting of these sections. Firstly, the bass extended downwards while the entire soundstage now had a bigger, bolder and solid feel to it. Bass guitar was meaty and played an active part in the mix while the lead guitar now had a gravity and weight. There was an improvement in imagery here too as the guitar now sounded like it was being played in a room or enclose space of some sort. Upper mids and treble were less effected here.
Again, though, the balance of the sound was pushed towards the bass area that didn’t harm the presentation terribly but did give the balance a knock downwards towards an emphasis in the lower regions. I found myself narrowing my eyes and saying, “Hmmm” a lot. The soundstage didn’t sound quite right.
I then moved the Boosters away from the monoblocks and to supporting the mains cables of my phono amp and the cables at the rear my turntable’s separate power supply. Both Boosters were installed with the top clamp on.
Thus, I had two Boosters on the first two stages of my hi-fi. That is, one connected to the source (the turntable power supply) and one on the next rung down (the phono amp). Here, the Boosters sounded much more at ease, well-rounded and assured.
After extended use, I found the Boosters here invaluable in these positions. In fact, they solved so many noise issues in these positions, I couldn’t remove them. The resultant pain was too great!
If you decide to install Boosters, I’d advise doing so from the source and then working your way down the hi-fi chain, as funds allow, to the amp and, if you’re like me, leave those monoblocks till last whereupon the final sound enhancements, at that point, will be better balanced overall. Putting the Boosters under the monoblocks first corrects the wrong end, if you get my drift. It’s a classic case of ‘arse about face’.
I then removed the Boosters from my hi-fi and was about to test the Booster Signals when I thought I’d try the original Boosters under my speaker cables, one under each cable. There was change of sound here, a focus of sorts. Trouble was, it also killed some of the dynamics. Hence, although many of the instruments offered greater precision, the Boosters removed a lot of the air and space from the soundstage, reducing dynamic reach. It was as if the Boosters were over damping the sound. A bit like over-treating your listening room. The Boosters killed the life out of the sound from the speaker cables.
Extended testing proved that the Boosters are better used for mains cables only. A place which needs more brute force to have an effect (this brute force has a detrimental effect on non-mains cables such as speaker cables). This is not the first time I’ve heard that ‘muscle’ is required when trying to affect mains signals. CAD’s Ground Controls basically demand a specialist product (i.e. the GC3) when it looks to clean mains signals, for example.
Adding the Boosters to the speaker cables might not have been a major success but I could hear potential there, nevertheless. For example, on the left channel was a persistent cymbal tapping which sounded like it had a phasing EQ attached to it which gave it a pulsing effect. Normally I heard tap [pulse in], tap [pulse out] on the majority of the track but with the Boosters added I was made aware of an extra percussive tap that I hadn’t noticed before! A softer tap sure but it was definitely there. Once I knew it was there, my brain drew attention to it and I could just about hear the effect with the Boosters off my hi-fi but, with the Boosters in place, they pointed a big Kenny Everrett-style foam finger right at this extra cymbal tap effect. I wondered if the Booster Signals might make more of this effect and, who knew, others too.
BOOSTER SIGNALS
I then turned to the Booster Signals. My first test was to remove the original Boosters that were supporting the mains cables behind the turntable power supply and phono amp mains cable and slip the Booster Signals under there instead.
Result? Although there was some noise reduction, the effect was a whole lot softer. The Boosters, on the mains cables, did appear to provide a more proactive and positive change to the soundstage.
Keeping the Boosters off and away from the hi-fi chain entirely, for a second, I moved the Booster Signals to the speaker cables. First one Booster Signal under each cable and then doubling up with two Booster Signals under each cable.
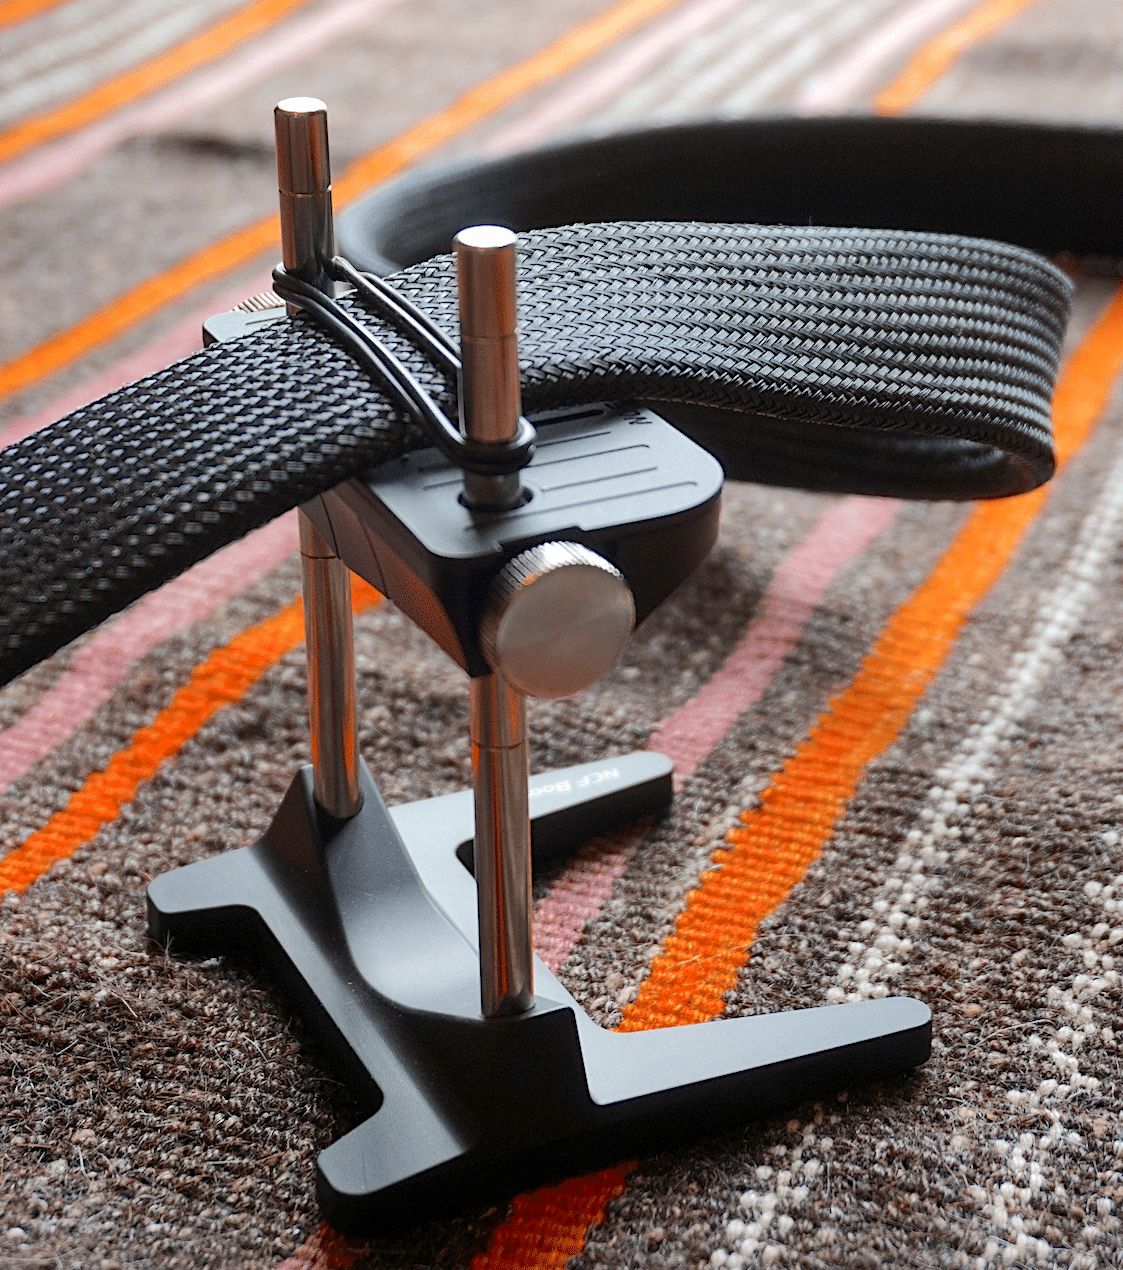
Using a single set of Booster Signals enhanced the focus of the music, reducing the percussive bloom, tightening the bass and increasing the pace, adding insight to the Bowie vocals as his triple tracked lead vocal offered midrange insight and greater detail in the resultant harmony effect while the bass guitar also tightened up, giving that instrument enhanced tonal accuracy. Even the rear-mounted rhythm guitar that provided a drone to the song at the rear of the mix was noticeable now, adding a significant effect to the entire soundstage.
As the going was good, I upped the Booster Signals to two on each cable. As I suspected, the addition of the extra Booster Signal on each cable lowered the noise still further adding a tremendous amount of clarity to the soundstage. Specifics? The articulation of the bass guitar shot through the roof! You could really hear the musician working on the bass here, constructing separate little patterns of his own to complement the rest of the music while the lead guitar sounded light and mobile.
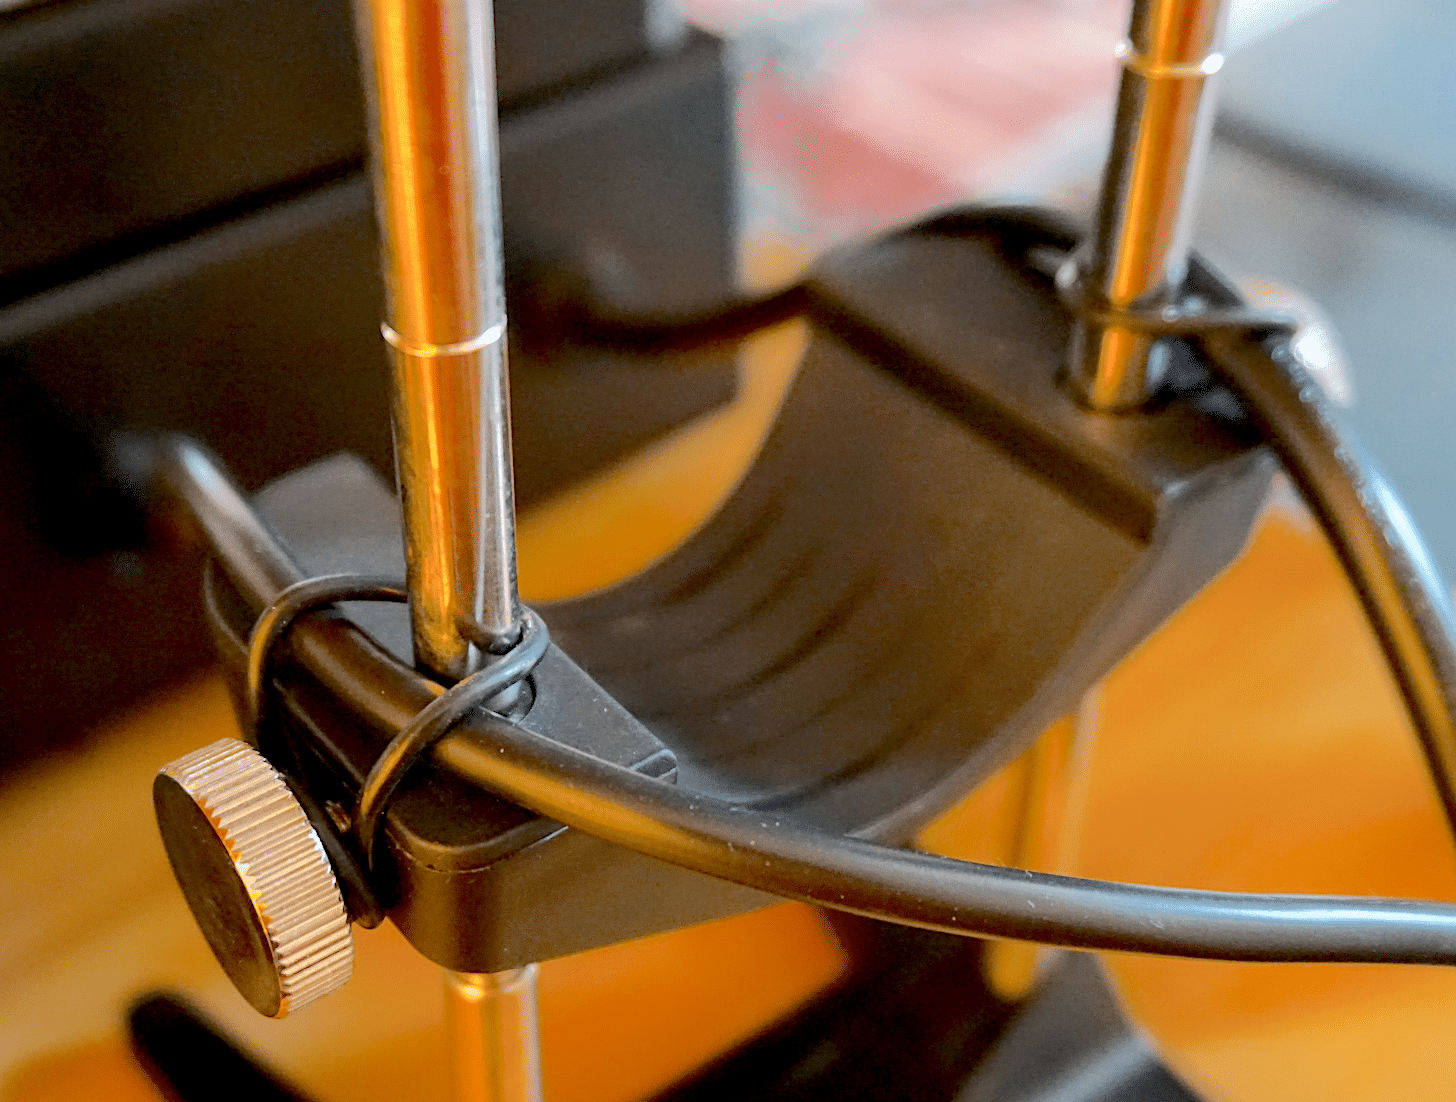
I also later tried the Signal Boosters, still in position under my speaker cables, but with a top clamp in place. Bad move. The dynamics were killed stone dead with an over-damped sound. So, I used the Signal Boosters without covers.
TWANG THOSE BANDS
Finally, I noticed one little accessory that I had thus far ignored. Rubber bands. Supplied separately bagged in the Furutech packaging, these sturdy bands where stretched between the supporting vertical posts (see image below). They served to keep the speaker cables in place but also pushed the cable onto the Booster Signal shelf and encouraged more cable contact with that shelf.
The effect was tremendous. Forcing more of the cable into contact with the noise-draining shelf pushed the soundstage left and right, giving the music a grander, epic demeanour. More than that, I noticed a significant reverb extension on cymbal taps which now seemed to extend by one extra beat in the music, adding to the overall subtlety of the presentation. In effect, the little rubber bands enabled the Booster Signals to really do a job on the cables.
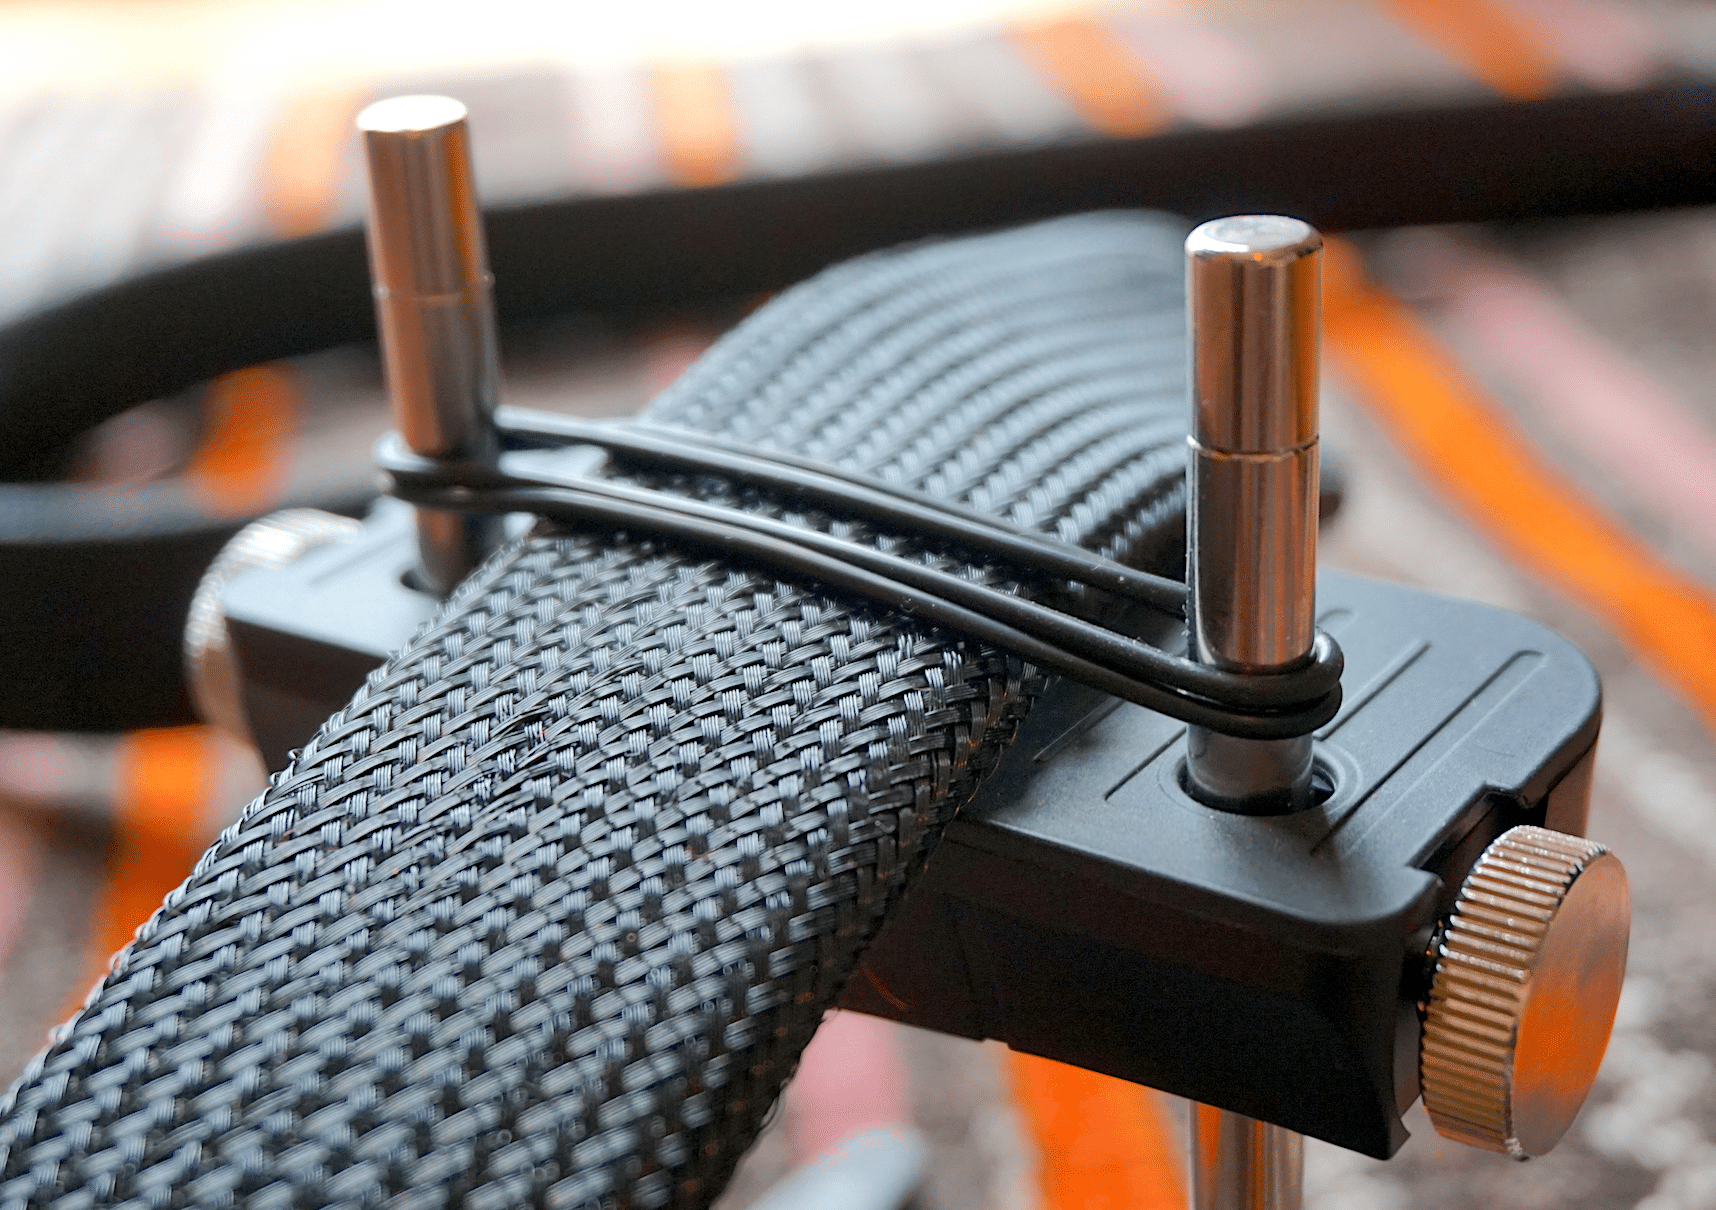
At this point, I kept the Booster Signals in place, under the speaker cables and then returned the original Boosters back to their mains cable positions at the phono amp and turntable power supply stations to see what the overall effect would be. Would the musical balance be retained?
Absolutely! Even playing other genres of music, from jazz to country, I had the best of both worlds, an open and airy midrange with plenty of insight and dynamic reach but then a firm and sold bass attack with a rich maturity that pushed the track onward at pace. The same effect was enjoyed with the Boosters attached to the rear of my digital system, using CD plus a CD transport with a DAC as sources.
CONCLUSION
I tested my system with two Boosters and four Booster Signals but, ideally, I should have had another three Boosters and around six to 12 Booster Signals to get maximum benefit. That said, even with my limited number of units, I was grinning all the way through this test. They all worked brilliantly when used in the right places.
I learn more about hi-fi every time I hit the power button but this test was a real eye-opener in terms of how cables work, how and where noise affects cables and how you can change that. From this test onwards, I look at cables in a whole new light.
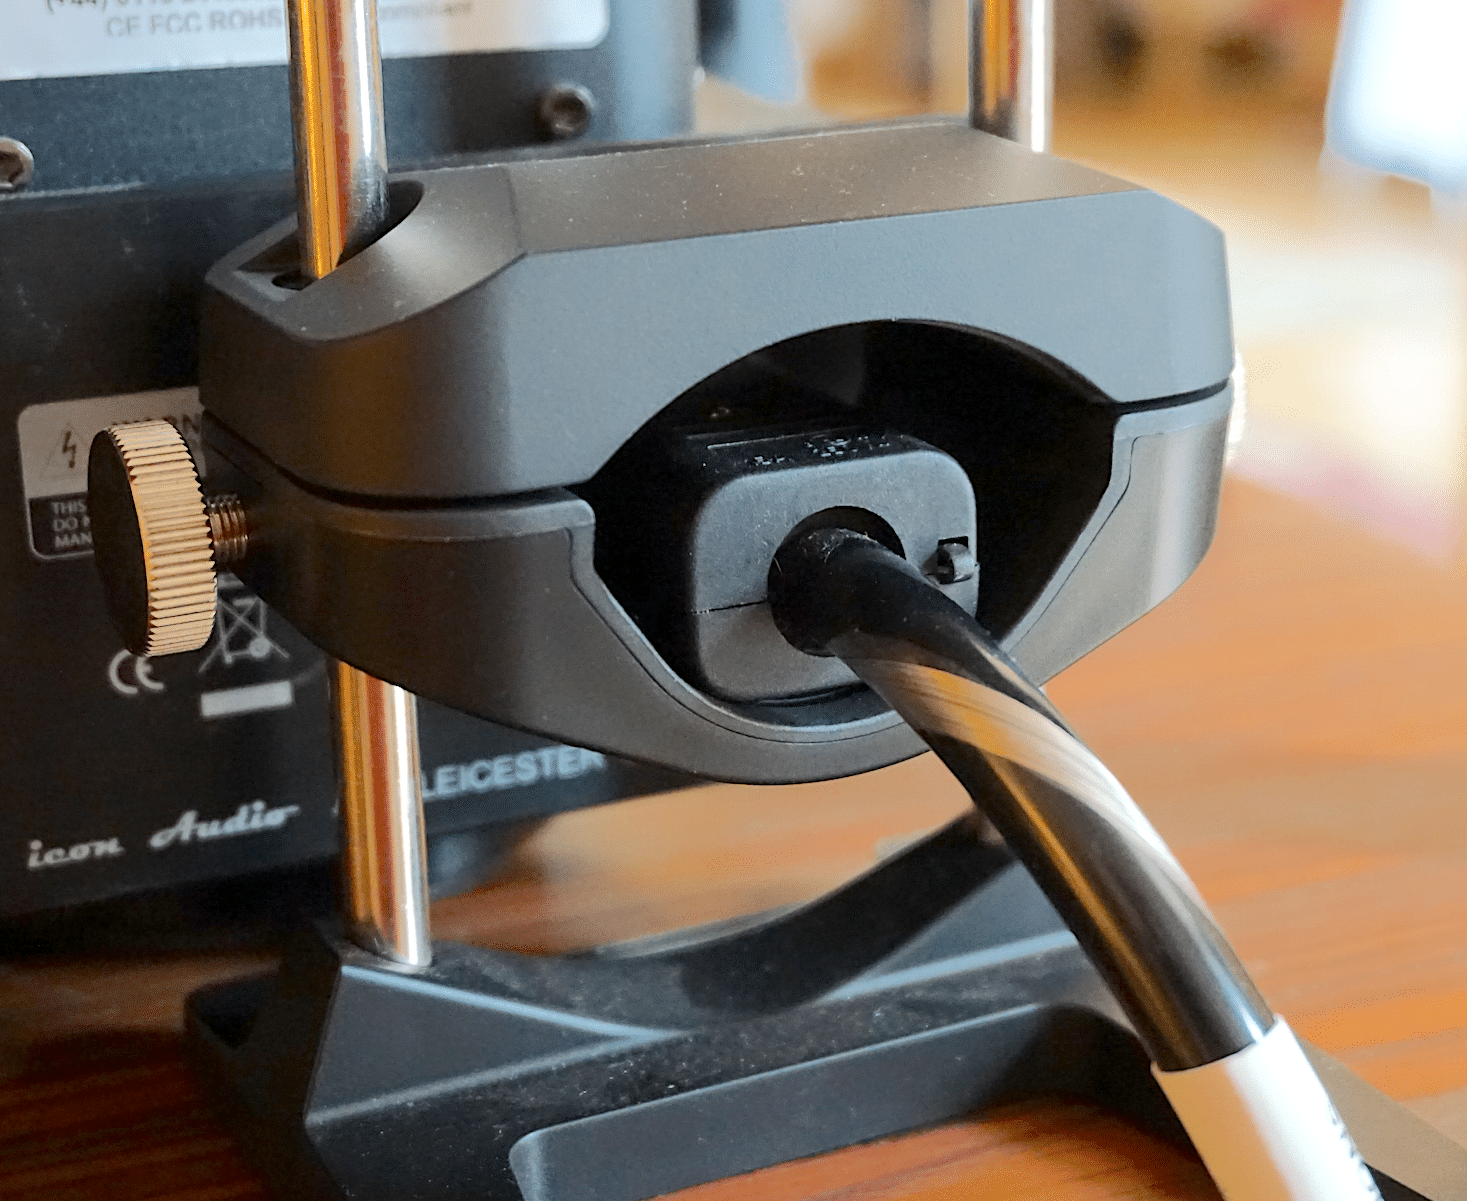
Bottom line? The NCF Boosters need to be in contact with mains cables. They are way too muscle-bound for more delicate items like speaker cables. The NCF Booster Signals are just the opposite, they don’t have enough oomph and power to affect mains signals but are perfect for cables themselves.
As a whole kit working together? They both reduce veiling noise, push back the stereo image and enhance the 3D effect of the same while encouraging the music that’s already there to come forth and be picked up by the ear. Job done, then! It fully deserves its super rare Golden Groovy.
FURUTECH NCF BOOSTERS & NCF BOOSTER SIGNALS
Prices:
NCF Booster: £290
NCF Booster-Signal: £175
Optional top clamp for NCF Booster-Signal: £122
Additional extension shafts (per 10): £30
Additional NCF Booster-Signal lower cradle: £106
Additional NCF Booster lower cradle: £110
Tel: 0118 981 4238
Web: www.furutech.com
TO BUY CLICK BELOW:
USA – https://amzn.to/3oSb42G
EUROPE – https://amzn.to/3kSkpFl
GOOD: low noise, easy to use, focused midrange, precise bass, airy soundstage
BAD: nothing
RATING: 10
[Don’t forget to check out my Facebook Group, The Audiophile Man: Hi-Fi & Music here: www.facebook.com/groups/theaudiophileman for exclusive postings, exclusive editorial and more!]
REFERENCE
Origin Live Sovereign turntable
Origin Live Enterprise 12″ arm
Van Den Hul Crimson XGW Stradivarius Cartridge
Icon PS3 phono amplifier
Leema Antila IIS ECO CD Player
Aesthetix Calypso pre-amp
Icon Audio MB845 Mk.II monoblock amplifiers
Quad ESL-57 speakers with One Thing upgrade
Vertex AQ, Gekko & Tellurium Q cable
Blue Horizon Professional Rack System
Harmonic Resolution Systems Noise Reduction Components
All vinyl was cleaned using an Audio Desk’s Ultrasonic Pro Vinyl Cleaner


Seriously – what do you guys smoke when “testing” those devices and writing reviews on them?
Mysteriously generated musical elements just by the help of some rubber bands?
C’mon: Get real and save the money for some “really” good stuff 🙂
Thanks for your thoughts ‘me’.
Paul,
How did you generate the signal/freq charts in your article>
The top-most diagram gives you a quick guide, Neal.
Too funny !
Not that such things don’t have an impact upon SQ (or tonal balance), it can, and does.
But the grandiose ‘mechano-style’ build looks like something more at home in a science lab project.
BTW, any device (cables, lifters etc.) that “enhances” the ‘bass’ (as in too much) -is a coloration, plain and simple.
Low-frequency resolution is key. And vital. The bass should almost never take ‘center-stage’ -it’s simply there to act as a near invisible foundation upon which the bulk of music instruments fundamental tones occupy.
When and if there is a substantial bass wallop, it should present itself cleanly, articulately, powerfully -yet ‘in behind’ the proceedings so to speak.
Audiophiles (or those who simply wish to experiment for themselves) can take virtually any household item, re-purpose it and experiment to one’s hearts content; whether acting as ‘footers’, cable-lifters, component shelves etc.
With respect to these cable lifters, one can employ a variety of handy-dandy household items to elevate cables from the floor. Never, ever clamp-down the cables however -let them micro vibrate naturally.
pj
Wow what an in depth review! Thought you were on your holidays???? A very contentious subject to broach but you succeeded for the simple reason you backed up your efforts with a mind bending array of testing and experimentation. Can’t have been easy lol! Anyway you listened, learned and were impressed enough to share your findings with us mere mortals. It’s our loss if we don’t bite üòä Enjoy……
Thanks Dermot. I did the review before I went on holiday. It might have been that review that triggered the holiday, actually 🙂
Well in that case you deserved that holiday! The only accessory I have by Furutech is the plastic plugs with magnetic coating on the outside end you plug into unused inputs on your preamp. I can’t recall their name as they don’t seem to do them anymore. Anyway I found this link that tries to explain everything you’ve covered above: Hope it helps…..
https://youtu.be/C7qq0WPHkmU
Missed that one – many thanks for the link, Dermot.