The Article
Vertex AQ Stage 3: a systematic approach
2nd March 2016
Built to drain away distortive noise from your hi-fi system, Paul Rigby reviews the Vertex AQ Pico grounding blocks
Before we get to the Picos, a quick word about where I am at with Vertex AQ. The Vertex AQ journey has offered plenty of time for contemplation. With each measured upgrade, there has been plenty of time for the effects to sink in before moving onto the next phase. Thus far, each upgrade and addition has increased the sonic qualities of my system by degrees and I can see, not only where each improvement is occurring but why. Often, hi-fi improvements include a bit of ‘magic’. The sort of ‘Ooo, where did that come from?” Which is fine and even delightful but prevents you from engaging with the upgrade totally, reducing your understanding of it. Sometimes, upgrades affect so many areas at once, you really don’t know what’s making the real, positive differences to your system. You’re not really sure which element has caused welcome sonic improvements and, hence, you don’t really know how to keep the improvements going. With this Vertex AQ suite of kit, each upgrade has been steady, clear and concise. I have a pretty good idea why each part of the final sound has altered and how it will change if I apply more changes to it.
There are also other, notable changes that you recognise when you live with this Vertex stuff.
For example, in the past, I noticed that my pre-amp gain was always set at around 60-64 (out of 100). This was always high enough. Any more always sounded harsh and began to hurt the ears. Now, with all other variables being equal, after the earlier Vertex AQ additions, that gain is regularly around 68-70 and my listening levels are at a comfortable volume. This one aspect is a massive clue as to how ridding distortive factors from your hi-fi chain can improve your listening experience.
In addition, I also noticed that, with the reduction of noise, there was a fundamental change in how music was being presented to me. That is, the structure of the soundstage was slowly changing, the vocals and instruments were moving in and out of the mix and in different directions which, over time, demanded that I change the position of my speakers to re-balance the sound.
Which made me wonder what effect the Picos would have on my system. I suspected that the effect would be minimal. Maybe subtle, possibly even negligible. Yes, their job was to drain noise from the ground of your system but surely the effects of this wouldn’t be that great would it?
WALK AROUND
I pressed ahead to see. On the desk in front of me was a pack of two Picos.
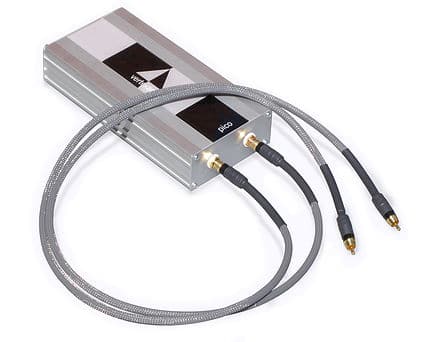
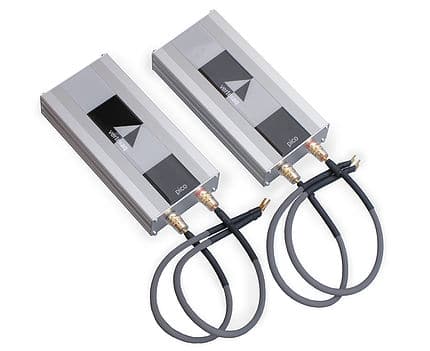
There were two types. One block with two RCA connectors on the end plate. The second block was largely the same in size and shape but arrived with speaker binding posts on the end plate. Each Pico arrived with a pair of short leads, mine where banana-type but XLRs are available too. Each lead is acoustically matched to the Pico (if you use another brand of cable, it wouldn’t work as well).
Let’s talk about the phono cable-type Pico first.
In the box are two separate channels. They are independent. There’s just two in a box and there’s no circuitry in them. The central signal connector in the end plate is not connected to anything. Inside is only a ground. There’s a stiffish wire, connected to a ground which then goes into a labyrinth. It you want to know more about the labyrinth technology then click HERE for a full rundown.
The cable is bonded inside and has access to EMI absorption technologies. The two wires do not connect together. If they did, you’d have a short circuit.
Vertex AQ boss, Steve Elford, explained further, “This means that, with each Pico, you have access to RFI/vibration and EMI grounding points. Effectively, the other end of the leads can be plugged into any other spare, unused RCA sockets. They can be on the back of a pre-amp, power amp, CD player, wherever. The central pin for the cable is purely a location point. Hence, you could use a spare left and right channel on your pre-amp and plug them in those. You could could put a pair, left and right, on the output sockets. You can even mix and match and put one cable in the input RCA sockets and one in the output. It won’t do any harm.”
You are tapping into the ground in different areas of your components to find the best performance for the unit. The idea is to experiment to see which pattern performs best, “In the back of a CD, you can put one cable into an RCA socket and another into a digital socket,” said Elford, “Again, you haven’t connected anything, you are just draining ground.”
Because each pack comes with two Picos, you’ve effectively got four little grounds that you can tap into anywhere into your system. “With the Picos, you are introducing EMI, RFI and vibration drainage on the grounds of wherever you’ve connected them. It will lower microphony and intermodulation,” said Elford.
With the other block, which offers the same design and construction, the only difference is the style of cable and connection points. The leads, this time, offer a banana connector on one end and a spade on the other. Ideal for either amplifiers or speakers, “The idea here is subtly different. The idea is to keep all of your cables on your amp or speaker but also fit the Picos. The Picos should be connected at the same time as your other cables.”
How can you do that? Well, if you have a banana cable plugged into a binding post of an amp or speaker then you would use the spade cable end of the Pico, unscrew the binding post a touch and slip the Pico cable in the spade connector. And vice versa. If you normally use spade connectors, then plug the Pico banana plug into the empty plug hole. Hence, in affect, it will look like each binding post has two cables connected to it: one in the banana plug socket and another in the spade connection point.
The thing to remember with the Picos and the attached cables is, you are not looking at the cable itself to change the sound of the hifi. This is not about cables. It’s not about upgrading cables or anything like that. This is all about changing how your current components behave. Not intrinsically. This is all about removing EMI, RFI and vibration and then, with those noisy elements drastically reduced, then seeing what’s left. What the hifi is capable of in the first place. Hence, this is not an upgrade – it’s all about maximising what you’ve already got.
SOUND QUALITY
I was looking forward to attaching the two variants of the Pico to see how they would tackle those distortive issues but also to see if the nature of the sound itself would be altered in any way. Yes, my system has improved with each stage of the Vertex AQ equipment installed but the journey is by no means over. I can hear nasties still in there…somewhere. It’s a bit like walking down a foggy road, I suppose. You can only see as far as the first tree, along the pavement. Remove a heap of the fog and suddenly you can see more detail but you can also still see that fog, even though it’s now further in the distance, by the second tree. In sonic terms, at this stage of the game, I was hoping the Picos would remove more noise so that, at least, I could see as far as tree number three.
To begin with, I decided to attach a single Pico to my pre-amp. I turned to the vinyl version of The Love Songs from Van der Graaf Generator lead singer, Peter Hammill’s solo album and the track, Just Good Friends.
The Pico introduced a smoothness to the introductory synth and the early vocal segments. The vocal, in fact, seemed to offer more information. The boundary, to the left and right of the Hammill delivery, trailed instead of being cut off suddenly. The trailing edges gave the vocal a more organic feel. More than that, as the song progressed, Hammill sounded separated from the orchestration. Before, his voice was part of the mix. With the Pico, there was a small but distinct separation so that the instruments sat slightly behind. Subtle but evident.
Bass was cleaner too. The drum strikes were multi-parted. Hence, there was the initial strike, then a very dry mid section before it disappeared down a reverb tail. Before, that dry mid section was slightly bloomy and smudged.
On a grander scale, a large blanket of woolly midrange veil had been removed which revealed little areas of compression in parts of the master, especially during crescendos, which gave the record a new honesty, if nothing else.
Next, I tried some vocal jazz and Ella Fitzgerald’s When The Sun Comes Out from the Sings The Harold Arlen Song Book album, beautifully mastered by Germany’s Speakers Corner record label. The differences here were more subtle in effect but more important in conclusion. The smooth Fitzgerald delivery did have a veiled effect, as if she was singing from behind the sofa. Post-Pico, there wasn’t a dramatic change but still a significant one, nevertheless. It was if a small switch turned the mode from ‘sofa’ to ‘vintage’. Fitzgerald now had a warm, sepia, 40s radio-type delivery which sounded like the rich tone you get from those very old, now very expensive ribbon microphones.
The jazz backing was also subtle in its improvement but there was a definite lift in the amount of detail on offer, a dynamic extension was also provided which gave the song a greater thrill and excitement, especially during the vigorous middle eight sequence.
For the next stage, I did it again, I added another Pico to my pre. The result was broad in its effects because it made just about every instrument pop out of the mix. That is, each instrument seemed to have more individual personality. The strumming guitar on the far left of the soundstage had a deep bass thrum to the slow strumming sound. Now, the guitar strings displayed a more metallic effect in addition to that bass. The saxophones emerged from the orchestral backing having a 3D effect while, what was this? A piano? I swear that I didn’t hear this instrument at all before. It must have been there but it didn’t wave at me to make itself noticeable. Now, it was making a contribution. More than that, Fitzgerald’s delivery held a more expressive performance.
For Peter Hammill, the issue of the compression lifting upper mids to bright levels was not quite as bad. The delivery from Hammill was smoother and also occupied a much larger space, giving his voice an airy and spacious presentation. The rest of the instruments also occupied this spacious area that gave the song a free and open aspect. It also added reverb enhancement to the sharp and precise percussion while both the organ and synths were now almost soundscape-like. Yes, there were still some sharp peaks during the crescendos on some instruments but the compressive issues were not such a problem.
Then I took a Pico off the pre and plugged it into, of all things, the CD player. Well, it was hooked up to the system and I thought, ‘What the hell.’ On my CD unit, there was a second pair of free phonos sockets available. Playing the Hammill vinyl again, the sound quality actually improved further. It was only when I decided to put it back into the pre that I realised that the improvements had followed. So the enhancements where nothing to do with the CD player, itself, therefore. What I was hearing was the Pico, slowly improving in sound quality over extended use over time. Improvements that would have occurred anyway, even if I’d left them where they where. So back to the drawing board I went and more experimentation.
Then it was the speaker’s turn. I plugged a spade cable-tagged Pico into each speaker terminal. The results were intriguing because this position didn’t really overwhelm me. The reduced compressive effects remained the same for the Hammill records while detail and clarity was of the same standard for Fitzgerald. What I did hear was a slightly enhanced focus. Everything seemed to happen in a smaller space. The sound was ‘efficient’ but nothing more. The differences were subtle but not particularly interesting.
So I removed the Picos from the speaker end and attached them to the power amp side of the speaker cable. This was better in sonic terms. The main improvement was an enhancement in instrumental separation. Hammill’s voice seemed to hang in space while other instruments pulled away from the group. As for Fitzgerald, the orchestral instruments on the edges of the sound stage now offered a larger presence, taking a bigger part in the song. The effect wasn’t major, it wasn’t gigantic but it was there.
Finally, while keeping one Pico in the rear of my pre-amp, I took the other Pico from my monoblocks and plugged it into the spare MM sockets of my phono amp (I was using the MC sockets for my turntable). The effect here was something special. Initially, I thought that the Pico had produced an overly clinical, edgy, almost bright sonic response so I disliked the Pico-lead sound at this point. Then I heard the new layer of silence that surrounded the change. It took a full 10 minutes but I got to thinking about the volume control on the front of my phono amp. I walked over, lowered the gain on the phono amp and, bingo!, everything sounded ok again. I then raised the gain on my pre by a touch and the volume popped back to normal levels. The upshot of this knob twiddling was that the phono amp was now operating at a lower gain setting with an enhancement to the airy and open nature of the soundstage.
CONCLUSION
Do the Picos change the sound of a typical hi-fi? Oh, yes. They have a positive effect on the final sound quality. The draining of distortive gunk from the system is not only immediate but also increases with time, changing the character of the sonic output gradually but reassuringly. Although, any Pico installation really needs a week or more to be heard properly and in full flow. More than that, as this test proves, you really need to plug the things into everything and everywhere and see what happens. More than that, what works for me might not work for you and vice-versa. It depends on your system. The Picos are ideal for those who like to tweak and dabble with their system.
I don’t see my own personal arrangement as the end of the Pico road. I still need to mix and match to find my ideal arrangement and I need more time to see if the sonic improvements improve further. One thing I do know, though, this new batch of Vertex AQ hardware (with the improvements already instigated by the mains equipment already connected to my hi-fi chain) has fundamentally changed, not only how my music is being presented to my ears, but how I have configured and am still configuring my hardware. Having to alter the position of my speakers, change the gain of my pre and now my phono amp shows how organic and inter-linked my hi-fi chain really is. I look forward to Stage 4.
THE VERTEX AQ SYSTEM STAGE 3
Good: plugging cables into any socket you like without worrying about explosions is fun, rebalanced sound, open and airy upper mids, characterful bass
Bad: nothing
Finish choices either silver aluminium finish with grey braid on leads or gunmetal anodised finish with black/silverline braid on leads.
Pico Component Grounding Block, two 1m leads – silver, grey £420 (gunmetal, black/silverline £460)
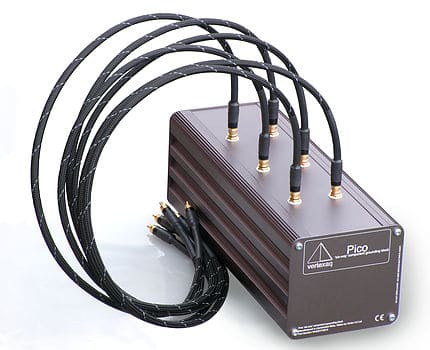
Six-way Pico Component Grounding Block, six 1m leads – silver, grey £1,160 (gunmetal, black/silverline £1,260)
Leads are RCA one end, with customer option on other end for RCA/XLR, BNC, spade (phono grounding) or crocodile clip (rack grounding).
Pair Pico Binding Post Grounding Blocks, four 0.5m leads – silver, grey £840 (gunmetal, black/silverline £920)
Fitted with universal binding posts. Leads are banana one end, spades other end.
VERTEX AQ
Tel: 01554 759267
Website: vertexaq.com
Facebook: www.facebook.com/vertexaq
RATING: 8/10
REFERENCE SYSTEM
Avid Acutus Turntable
SME IV arm
Benz Glider cartridge
Icon Audio PS3 phono amplifier
Aesthetix Calypso Pre
Icon Audio MB845 Mk.II monoblocks
Quad ESL-57 speakers with One Thing upgrade
Vertex AQ and Tellurium Q cabling

